Hanging 4 Pictures On A Wall

78 Layouts For Hanging Photographs And Artworks On Empty Walls Like A Pro Home Diy Sweet Home New Homes

Let S Design A Picture Wall Photo Arrangements On Wall Hanging Photos Eclectic Gallery Wall

65 Plus Photo Gallery Wall Layout Ideas Photo Gallery Wall Layout Photo Wall Display Photo Wall Gallery

Gallery 1 Photo Arrangements On Wall Hanging Photos Eclectic Gallery Wall

How To Hang Picture Frames As A Collage Diy 4 Home Ideas Home Diy Sweet Home New Homes

A Day Of Play Blog Archive Guide To Hanging Photos Family Pictures On Wall Photo Wall Display Gallery Wall Layout
Hang your pictures securely.
Hanging 4 pictures on a wall. The saliva will leave a light mark for placing a nail. Once it s secure hang your picture on the hook. For an easy way to hang pictures without nails you can use picture wire. A great picture or piece of artwork can be a source of pride but it can also be a source of headaches if it simply won t stay put on the wall.
Jan 18 2016 explore casey landaal ricchio s board ideas for grouping or hanging pictures and some cute picture ideas followed by 761 people on pinterest. Then place pictures so that the center point of the piece or grouping is at approximately eye level. To simplify this as a formula we might write it as such. Drive in the fasteners.
To hang a group of 4 pictures for example consider hanging it as one entire square. Lick your middle knuckle and grab the hanger on the back of the picture with the wet finger. Measure from the top of the frame to each of the rings. Press your knuckle against the wall when the picture is exactly where you want it.
Once you ve decided where you want to hang a picture make a mark on the wall in pencil on pieces of masking tape if you wish for each hook. Reader leann cormier. A dining room wall decoration arrangement is best slightly lower to enjoy looking at it most while you are sitting down. But although it may seem easy hanging a picture properly is much more than a haphazard task.
Email or call us today to know more about our picture frames and hanging them. If a room has a slightly sloping floor or ceiling start by hanging the pictures level. Here are five favorite tips for taking a one hole approach to hanging a picture on the wall. Now we divide that 40 by 4 to give us an interval between the paintings of 10.
This page loads the wizard which can be used to calculate the heights and spacings of picture frames to be hung on walls. If they look crooked cheat just a bit so they look straight even if they re not. Remove the front liner from the strip and firmly press the utility hook against the surface. This means that from the edge of the wall to the paintings is a space of 10 and between each painting is also a space of 10.
Remove the back liner from the adhesive strip and apply it directly to the wall where you want to hang your picture. See more ideas about home diy hanging pictures home projects. Save yourself the hair pulling that comes from constantly re adjusting and re hanging problem pictures by installing your picture right the first time. Hold it steady and in place for 30 to 40 seconds.
Use the level to make sure the marks are at the same height.

78 Layouts For Hanging Photographs And Artworks On Empty Walls Like A Pro Design Bedroom Layouts Hanging Pictures

Frame Positioning Ideas Photo Arrangements On Wall Hanging Photos Eclectic Gallery Wall

The How To Of Hanging Wall Art Hanging Wall Art Hanging Pictures On The Wall Hanging Pictures

How To Hang Multiple Pictures Tips For Hanging Groups Of Wall Art Artwork For Home Creative Home Decor Hanging Multiple Pictures
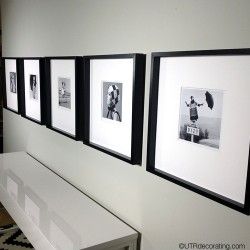
How To Hang Pictures In A Row Utr Deco Blog Hanging Pictures On The Wall Hanging Pictures Hanging Picture Frames

Unique Ways To Hang 8x10 And 5x7 Photos Google Search Picture Wall Bedroom Photo Wall Display Gallery Wall Display Ideas

Walll Displays Of Family Photos Wall Today I Ll Be Sharing Some Fun Ideas For Your Next G Photo Gallery Wall Layout Photo Wall Display Photo Wall Gallery

Ikea Us Furniture And Home Furnishings Picture Collage Wall Frame Wall Collage Gallery Wall Layout

Perfect Picturewall Picture Frames And Photo Frames Template Size 4 X 6 5 X 7 8 X 10 Frames Mats P Frames On Wall Gallery Wall Layout Gallery Wall Staircase

Pin By Linda Hancock On Picture Hanging Canvas Wall Collage Multi Piece Wall Art Large Wall Canvas

Ikea Matteby Set Of 4 Wall Collage Templates For Hanging Photo Picture Frames Ebay Frame Wall Collage Picture Collage Wall Gallery Wall Frames

Picture Frame Layouts Home Home Decor New Homes

Diy Gallery Wall Layouts For Your Home In Every Style Design Diy Ideas Diy Gallery Wall Photo Wall Gallery Gallery Wall Layout

4 Tricks For Hanging A Gallery Wall Gallery Wall Hanging Wall Art Hanging Picture Frames

Wall Hanging Decorating Ideas For Your Home 4 Men 1 Lady Home Home Decor Interior

How To Evenly Hang Group Of Pictures If You Have 4 Pictures Then You Will Have 5 Empty Spaces Between Each Pic Hanging Pictures Hanging Wall Art Wall Gallery

Neutral Collage Picture Frame 12 4 X 6 Wall Hanging Photo Decoration Country Cottage Home Decor Cream Taupe Brown Black Color Gift Him Her Hanging Photos Collage Picture Frames Hanging Wall Decor

Distressed Frames Set Of 4 Wall Hanging 8x8 Opening In Neutrals 250 00 Via Etsy Distressed Frames Diy Gallery Wall Diy Decor Projects
1

4 Common Wall Hanging Myths Busted Simple Bedroom Design Traditional Living Room Decor

Command 4 Lbs Large White Plastic Picture Hanging Strips 4 Strips 17206 The Home Depot Decor Diy Home Decor Picture Hanging

4 Pieces Large Wood Wall Art Modern Wall Hanging Geometric Wood Wall Mosaic Wood Hanging Sculpture Farmhouse Decor Abstract Wood Art Wood Sculpture Large Wood Wall Art Wood Wall Art

Photo Wall Home Decor Decor Home

Distressed Frames Set Of 4 Wall Hanging 8x8 In Neutrals Distressed Frames Diy Gallery Wall Diy Decor Projects

Display Photo Wall Gallery Gallery Wall Inspiration Photo Wall Display

4 Tricks For Hanging A Gallery Wall Gallery Wall Hanging Wall Art Photo Wall Art

Modern Macrame Wall Hanging 4 Modern Macrame Macrame Wall Hanging Wall Hanging

Https Encrypted Tbn0 Gstatic Com Images Q Tbn 3aand9gctsvpzoegdl8to6 Gbtelbqp4yyot20hwmdya Usqp Cau

4 Opening Hanging Nautical Collage Picture Photo Frame Wall Gallery Home Decor Home Garden Home Decor Frames Art Collage Wall Wall Collage Frames On Wall

Asian Oriental Set 4 Black Lacquer Mother Pearl Wall Art Hanging Panels Decor Asian Wall Decor Asian Wall Art Hanging Wall Art

Asense Antique Golden Collage Photo Frame Wall Hanging 4 By 6 Inch Photos Golden You Ca Picture Frame Quotes Cheap Picture Frames Picture Frames For Sale

Pin On Photo Displays

Lion King Set Of 4 Wall Art Decor Child Bedroom Wall Hanging Etsy Letter Nursery Decor Decor Family Decor

Amazon Com Nikky Home Wooden Framed Wall Hanging Laundry Guide Plaque Sign For Laundry Room Home Kitchen Retro Laundry Room Laundry Room Decor Laundry Room

4 Quick Easy Tips To Hanging Wall Art A Bonus Hanging Wall Art Wall Hanging

Crescent Moon Minimal Macrame Wall Hanging 4 Sizes 14 Etsy In 2020 Macrame Wall Art Macrame Wall Hanging Macrame Wall Hanging Diy

Vintage Oriental Set 4 Wall Hanging Framed 3d Black Gold Metal Floral Art Decor Unbranded Asianoriental Metal Flower Wall Art Floral Art Art Decor

Amazon Com Gallery Solutions Flat Wall 21 Opening Collage Frame For 4x6 Images With Black Mat Hanging Picture Frames Collage Picture Frames Collage Frames

Wall Hanging Photo Album Holds 10 Instax Mini Size Photos Each Save On Multiple Hanging Photos Photo Wall Display Instax Mini Ideas

21 99 Collage Picture Frame Holds 9 Images Wall Hanging Multiple Photos 4 X 6 C Collage Picture Frames Photo Frame Display Frame Wall Collage

4 Pcs Lot Room Divider Hanging Screens Simple Comfortable Folding Screen For Room Personalized Wall S Room Divider Walls Decorative Room Dividers Room Divider

4 Common Wall Hanging Myths Busted Home Interior Interior Design

